Custom Dashboards using Designer Mode
In addition to the prepackaged dashboard designs that com with BigComm Pro, the Registered version of BigComm Pro provides a WYSIWYG dashboard designer that allows you to create just about any custom dash you can dream up. For the most part this is relatively intuitive to use. However, as the design of you dash gets more complex, it can become tedious. I have outlined here several tips that should help you get thing looking just the way you want them with less time spent.
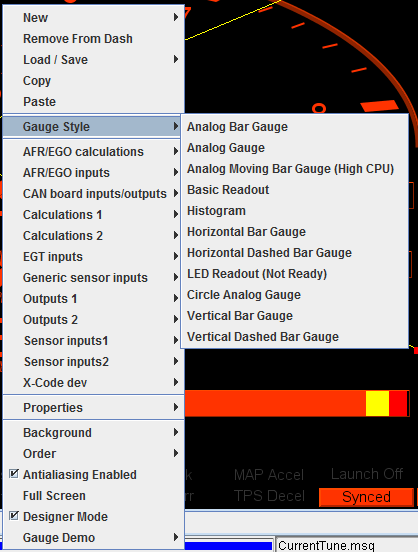
To use Designer Mode - You can enter designer mode on any editable gauge cluster in BigComm Pro by simply "Right Clicking" anywhere on the dashboard, then selecting "Designer Mode"
Before covering what settings and gauge attributes you can change, there are a few tips to navigating and selecting the components that can greatly simplify the process.
There are many different Attributes you can set for every gauge, from colors to operating ranges. What attributes are available or how they behave will depend on the selected Gauge Style. So first you will need to determine the desired Gauge Style.

Gauge Style - selects what painter will render the gauge. This will drive the core behavior of a gauge and its general look. There are many styles available from typical round analog gauges or basic read outs to some more fancy styles with new ones coming.
To select the Gauge Style, right click on a selected gauge or group of gauges, on the pop up menu select:
"Gauge Styles --> {your Choice}"
Quick Tips:
Multi-Selecting components - By Holding the CTRL key, and clicking on additional gauges and indicators. Each selected gauge or indicator will have a yellow X appear over it to show it is selected and provides a handle for resizing in the bottom right corner. The first selected Gauge will drive the the initial value of any properties you should go to change.
For Example, you have 1 gauge with a Font Color that you want to apply to another 2 gauges:
- 1st Select the the gauge with the desired target color
- Press the CTRL key and Click on the other 2 gauges you want to have the same color.
- Right Click on any of the selected Gauges
-
On the popup Menu Select
Properties --> Gauge Colors --> Font Color - A Color Dialog will open and the Color set to the Font Color of the first clicked.
- By Clicking Apply in the Font Color Dialog, that Color will be applied to all selected Gauges.
Tab Key Selecting - If you have a number of stacked Gauges it can become difficult to select a specific gauge with the mouse. In this case you can select a specific gauge by pressing the tab key to cycle through them. The tab key will move through according to the Z Order as in the order the stack on top of each other.
If it becomes difficult to tell which gauge is selected, you can open the "Gauge Text" dialog by right clicking and selecting "Properties --> Gauge Text". This dialog will then show the text for what ever gauge is selected. As you cycle through them, the text will be updated to the values for the selected Gauge.
